In this blogpost I will explain the following items:
- The requirements for MSA’s
- Implementation of MSA's
A MSA depends on the object class msDS-ManagedServiceAccount, for which your schema needs to be at the level of Windows Server 2008 R2. Also, only Windows Server 2008 R2 and Windows 7 support MSA's.
MSA's update the password in the same way as a computer account updates it. By default, the password of a MSA gets updated when the computer account updates it's password. They don't listen to password policies and cannot be locked out or perform interactive logons.
By default all MSA's are created in the CN=Managed Service Accounts,DC=domain,DC=net. When using DSA.MSC and setting it to show "Advanced Features" also displays them.
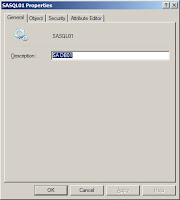
However, as you see when you open the properties of a MSA, there's nothing to be set apart from the description. This is because all administration of MSA's is done in Powershell.

MSA's automatically maintain their own SPN's but cannot be linked to multiple computers at a time or to a cluster node.
2. Implementation of MSA's For the sake of argument I'll assume you are creating a service account for use with SQL (although this isn't supported by SQL Server yet because of VSS Backups and such). Also, I will use the name SASQL02, but ofcourse you're free to change this to anything you want. For the servername I will use DB01.
At the moment it's not possible to create a MSA that's longer than 15 characters, so stay under this limitation (see http://derek858.blogspot.com/2010/02/server-2008-r2-managed-service-account.html for more information about this)
1. Open Powershell with the AD-Powershell modules loaded (Load this by using import-module ActiveDirectory within Powershell)
2. Create the MSA by using:
New-ADServiceAccount -Name SASQL02 -Enabled $True3. Now, associate the MSA to a computer account:
Add-ADComputerServiceAccount -Identity DB01 -ServiceAccount SASQL024. Logon to the server on which the MSA will be running (in my case DB01). It's necessary to have the following features enabled on the target server:
- Active Directory Module for Windows Powershell
- .NET Framework 3.5.1
6. Install the MSA at the server by using:
Install-ADServiceAccount -Identity SASQL02To install a MSA on a server you will need Local Administrator permissions on the target server and modify permissions on the MSA object in Active Directory.
7. Open up services.msc.
8. Browse to your service and double click on it.
9. Click the tab Log On.
10. Click Browse and type the name of the MSA.
11. The account name is filled in in the following screen. You can see it's a MSA by looking at the dollar sign ($) behind the account name. Also, it's very important that the password field remains empty!
12. Click OK and restart your service. After this moment it's no longer needed to manually change passwords, because your MSA will take care of this.
In a later blogpost I will explain how MSA's are maintained through your environment. In the meantime also check out This post by Ned Pyle.
Regards,
Stefan Hazenbroek


