dinsdag 28 december 2010

FS: Disable the Restore button in Previous Versions

Previous Versions (or, Volume Shadow Copy Service) is a very powerful way of letting users manage their own files in an enterprise environment. One issue however, especially for department-shares, is the possibility to restore a file using Previous Versions. There is no pretty way to disable this using a group policy or something similar, but it IS possible.

By default it is possible for users to restore files. By following the next steps you can turn this off so that only Open and Copy can be used.

  1. Fire up the registry (regedit).
  2. Browse to: HKCU\Software\Microsoft\Windows\CurrentVersion\Explorer to turn it on or off for the current user or HKLM\Software\Microsoft\Windows\CurrentVersion\Explorer to turn it off for the local machine. I suggest turning this off on a user basis, so that your IT Administrators can still manage this if needed.
  3. Create a new REG_DWORD with the name NoPreviousVersionsRestore. The value for this entry is 1.
It isn't needed for the users to log off and on again for the setting to be put into place. I suggest putting this in a group policy preference for ease of management.

Hope this helps.

Regards,

Stefan Hazenbroek

zaterdag 23 oktober 2010

DFS: Manual removal of a DFS Link.

It can happen to everybody. A DFS Link gets deleted in the wrong way by accident, and now it's stale sources are being a burden in your DFSroots directory. This can happen due to errors in namespace replication or unclean shutdowns. The directory cannot be opened or manually deleted, so how can we get rid of this?

When you try to open the directory you'll get the following error:

It makes sense to get this error, because DFS make a sort of junction point on your fileserver to relocate you to the real point. When you try to delete the folder you'll get this error:


When a DFS link gets created, a reparsepoint is created in the DFSroots directory. This is a link to the original directory. Also, see: http://msdn.microsoft.com/en-us/library/aa365503(VS.85).aspx for more information.

This reparsepoint is also what's causing the error. Normally, if you try to open a reparsepoint (like AppData in Windows 7 is), you'll get redirected to the original directory. In the case of DFS this works somewhat different, because the original directory isn't located on the same server.

To fix this we have to take some steps. First, open up Command Prompt and browse to your DFSroots directory. In my case this is C:\DFSroots. Open up your DFS namespace and look at the folder contents. This folder is what's being published when an user accesses your DFS namespace.


Above are the folder contents of the DFSroots folder in my test environment. Top Secret is a stale folder, so I'd like to delete this. Windows contains a tool called fsutil that can help us reach this goal. Type: fsutil reparsepoint query \\. In my case this would be fsutil reparsepoint query "C:\DFSroots\Public\Top Secret". Remember to enclose your query with quotes ("") when your name contains spaces.

The result should look alot like the following:

As you can see within the Tag Value, this reparsepoint is created by/for Microsoft DFS. Now, we're gonna delete this reparsepoint so our view of the namespace will be nice and clean again. Type: fsutil reparsepoint delete \\ and press Enter. Again, mind the quotes.


In this case the rule is: No result is good result. When you get a blank line your command succeeded. When you try to remove something that's not a reparse point you'll get an error looking a lot like the following one:

This means the reparse point is already deleted or you're giving in the wrong directory in your command line.

Hope this helps in keeping your DFS environment clean and tidy.

Regards,

Stefan Hazenbroek

File Services: Shares not available after a reboot

A short while ago a question was asked on the Technet Forums regarding folders not being shared as expected after a reboot. This specific issue was in regard to BitLocker, but this same issue applies when the folders are being hosted on a volume that's connected through a SAN (Fibre/iSCSI and such)

After being able to answer the question I thought I'd post a short blog article in regard to this issue, because it's a very common issue and not very well documented.

Issue
When you reboot your server all shares that are hosted on a SAN, on a BitLocker protected volume or anything other that needs a service in order to ensure it's availability. After restarting the Server service these shares come available, but there are no clear errors in the eventlog that states something is wrong.

Resolution
The issue is due to the BitLocker (or the service that connects your FC/iSCSI devices) service not being started yet when the Server service is started. When the server service is started, it tries to locate all folders to share and disregard the ones that aren't reachable. Because the service required is started shortly after, you won't notice any apparent issues until you investigate them.

Luckily this issue is quite easily fixed by editing a value in the registry. I'll explain this by showing an example.

1. First, open up services.msc.

When you look at the screenshot below, you'll see the shortname of BitLocker Drive Encryption. Write down this name or save it somewhere, we'll need it later.


2. Open regedit (Start, Run, type: regedit)

Browse to Hkey Local Machine\SYSTEM\CurrentControlSet\LanManServer


When you look in the key you'll see a value called DependsOnService. In my case this value is filled with SamSS and Srv. Open up this value.

As you can see, both services that need to be started in order to start the Server service are SamSS and Srv. Place the cursor after Srv and press Enter. Now type bdesvc (or the name of your required service you located in Step 1) and press Enter again. After filling in the value it should look like this:


Press Ok and reboot your server.

After a reboot your shares will be available directly from boot as they should be. Remember to remove the added service when you disable BitLocker again or remove the disks from SAN, otherwise the Server service won't be able to start.

Hope this helps.

Regards,

Stefan Hazenbroek

maandag 5 juli 2010

Active Directory: Managed Service Accounts

Windows Server 2008 R2 introduces the new and nifty feature that's called "Managed Service Accounts". A Managed Service Account (from now on I'll call it a MSA) is an account that is tied to a specific computer (for example an IIS Server) and maintains it's own password and SPN's. I can't remember the number of times a service wouldn't start after a reboot of a server because the password for the service had changed but they forgot to change the password at all necessary places.


In this blogpost I will explain the following items:
  1. The requirements for MSA’s
  2. Implementation of MSA's
1. The requirements for MSA's
A MSA depends on the object class msDS-ManagedServiceAccount, for which your schema needs to be at the level of Windows Server 2008 R2. Also, only Windows Server 2008 R2 and Windows 7 support MSA's.


MSA's update the password in the same way as a computer account updates it. By default, the password of a MSA gets updated when the computer account updates it's password. They don't listen to password policies and cannot be locked out or perform interactive logons.


By default all MSA's are created in the CN=Managed Service Accounts,DC=domain,DC=net. When using DSA.MSC and setting it to show "Advanced Features" also displays them.

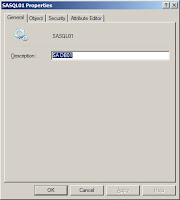
However, as you see when you open the properties of a MSA, there's nothing to be set apart from the description. This is because all administration of MSA's is done in Powershell.


MSA's automatically maintain their own SPN's but cannot be linked to multiple computers at a time or to a cluster node.


2. Implementation of MSA's For the sake of argument I'll assume you are creating a service account for use with SQL (although this isn't supported by SQL Server yet because of VSS Backups and such). Also, I will use the name SASQL02, but ofcourse you're free to change this to anything you want. For the servername I will use DB01.


At the moment it's not possible to create a MSA that's longer than 15 characters, so stay under this limitation (see http://derek858.blogspot.com/2010/02/server-2008-r2-managed-service-account.html for more information about this)


1. Open Powershell with the AD-Powershell modules loaded (Load this by using import-module ActiveDirectory within Powershell)


2. Create the MSA by using:
New-ADServiceAccount -Name SASQL02 -Enabled $True
3. Now, associate the MSA to a computer account:
Add-ADComputerServiceAccount -Identity DB01 -ServiceAccount SASQL02
4. Logon to the server on which the MSA will be running (in my case DB01). It's necessary to have the following features enabled on the target server:
  • Active Directory Module for Windows Powershell
  • .NET Framework 3.5.1
5. On the server start Powershell with the Active Directory modules loaded.


6. Install the MSA at the server by using:
Install-ADServiceAccount -Identity SASQL02
To install a MSA on a server you will need Local Administrator permissions on the target server and modify permissions on the MSA object in Active Directory.


7. Open up services.msc.


8. Browse to your service and double click on it.


9. Click the tab Log On.


10. Click Browse and type the name of the MSA.


11. The account name is filled in in the following screen. You can see it's a MSA by looking at the dollar sign ($) behind the account name. Also, it's very important that the password field remains empty!


12. Click OK and restart your service. After this moment it's no longer needed to manually change passwords, because your MSA will take care of this.


In a later blogpost I will explain how MSA's are maintained through your environment. In the meantime also check out This post by Ned Pyle.


Regards,


Stefan Hazenbroek
NOTE: For some reason all images have gone byebye on me. I’ll repost them soon.

dinsdag 11 mei 2010

ConfigMgr: AD Permissions for Domain Join Account

It's a good practise to use a service account for any sort of automated task, and this is no different with SCCM Operating System Deployment.

SCCM OSD has the capability of automatically adding a workstation to the domain during the Task Sequence, so the amount of work that needs to be done by hand is kept to a bare minimum. You use a service account in SCCM that has the permissions to add the computer to the needed OU, but what permissions do you need exactly?

Well, at a minimum you'll need the following permissions:


I hope this helps, I know I'll be back when I need it set again :)

Regards,

Stefan Hazenbroek